
Getting your DJI Phantom 4 ready before a flight is one of the most important parts of safe and successful drone operation. A lot of problems that happen in the field do not start in the air. They usually start earlier, with outdated apps, old firmware, weak signal planning, skipped calibrations, or not checking whether the drone and mobile device are fully compatible. This setup guide is designed to help you prepare properly before leaving home, confirm flight readiness once you arrive on site, and understand the most important safety precautions while flying with the DroneDeploy app and DJI GO.
The basic idea is simple: do as much preparation as possible before you get to the field. Firmware updates, app updates, compatibility checks, and calibration reviews are all much easier to handle at home where you have time, internet access, and fewer distractions. Once you arrive at your flight location, your goal should be to confirm that the aircraft is healthy, GPS is locked, and the drone is safe to launch. According to the provided setup instructions, outdated firmware and uncalibrated hardware are among the most common causes of flight problems and unexpected behavior.
Why setup matters before flying
A DJI Phantom 4 can be a very capable aircraft, but it depends heavily on correct preparation. The setup notes emphasize that you should know what you need to do before leaving the house, especially if you plan to use DroneDeploy for automated flight. That means checking that your drone model and your phone or tablet are supported, making sure your operating system and apps are current, confirming aircraft firmware, and verifying calibration and GPS readiness before takeoff. Doing these steps ahead of time reduces delays in the field and makes the whole flight process much smoother.
1. Check compatibility first

Before anything else, confirm that both your DJI Phantom 4 and your mobile device are compatible with the software you plan to use. The source specifically recommends checking compatibility for both the drone and the phone or tablet before moving forward. This matters because even if the aircraft itself is supported, an unsupported device or operating system version can cause poor performance, connection issues, or app instability.
When checking compatibility, make sure of the following:
-
Your Phantom 4 model is supported by the flight app you intend to use
-
Your mobile device is officially supported
-
Your device’s operating system version is compatible
-
The required DJI and DroneDeploy apps are available and current
Even experienced pilots sometimes overlook this step, especially after changing phones or tablets. A new device may work well for everyday apps but still behave poorly with flight software if it lacks full compatibility.
2. Update your mobile device OS and apps

One of the most important setup steps is making sure that your mobile operating system, DroneDeploy app, and DJI GO app are all fully updated. The source recommends checking for iOS or Android updates first, and then checking the App Store or Google Play for updates to the apps themselves. It also recommends enabling automatic updates.
This is important for several reasons:
-
App updates often fix connection or stability issues
-
Operating system updates may improve compatibility
-
New drone firmware may expect newer app versions
-
Older app versions can sometimes prevent normal setup or flight automation features from working correctly
A very practical habit is to update everything at home over reliable Wi-Fi. That way, you are not standing in the field waiting for a firmware package or app update to finish while weather, light conditions, or battery time are slipping away.
3. At home, check firmware in DJI GO
The setup notes strongly recommend checking the aircraft firmware at home in DJI GO. To do this, connect the controller and drone to your mobile device, then open DJI GO. The instructions explain that the first screen will check for firmware updates as it searches for them. If there are no pending updates, enter your drone and make sure the aircraft status shows “Normal - Ready (GPS)”.
This step is especially important because the source clearly states that out-of-date firmware and uncalibrated hardware are the two most common issues that prevent people from flying or cause unexpected behavior.
A careful at-home firmware check should include:
-
Powering on the remote controller
-
Powering on the drone
-
Connecting your mobile device
-
Opening DJI GO
-
Waiting for the app to check firmware status
-
Confirming there are no pending firmware updates
-
Verifying the aircraft status is normal and GPS-ready
This is not just a technical routine. It is a preventive safety check. If there is a firmware mismatch or a required update, it is much better to discover it at home than at a job site or launch area.
4. Avoid doing major updates in the field
The instructions explicitly warn against checking for updates in the field, explaining that doing so is a recipe for waiting too long for a download or attempting to fly with outdated firmware.
That warning is practical and important. Field conditions are often the worst place for updates because:
-
Mobile internet may be slow or unstable
-
Battery charge is being consumed while you wait
-
Bright sunlight can make troubleshooting harder
-
Pressure to start flying can lead to rushed decisions
A better approach is to treat home setup as mandatory. Update first, test second, and travel only after the aircraft is ready.
5. In the field, confirm flight readiness
Once you arrive at your takeoff point, do not launch immediately. The instructions say that by this stage you should already have confirmed updates, and now your job is to confirm that the drone is flight-ready in real conditions. The guide recommends opening DJI GO first and making sure the aircraft reports “Ready to Go - GPS” before using DroneDeploy. It also specifically says to hard-quit DJI GO before opening DroneDeploy.
This is a critical sequence because DJI GO is useful for pre-flight checking, but DroneDeploy is the app you may want for automation. If both are left open at the same time, they can compete for connection or control.
Here is the recommended order in the field:
-
Open DJI GO first
-
Confirm the aircraft is healthy and GPS-ready
-
Check for calibration needs
-
Hard-quit DJI GO
-
Open DroneDeploy only after readiness is confirmed
This sequence helps reduce conflicts and gives you one final chance to catch issues before automated flight begins.
6. Check compass and IMU calibration
The setup document highly recommends opening DJI GO before DroneDeploy to make sure the compass and IMU do not need recalibration. It notes that travel itself can cause these instruments to become uncalibrated. The document also says to confirm that you have enough satellite coverage before takeoff.
This is easy to underestimate, especially if your drone was working fine the last time you flew. Transporting the aircraft in a vehicle, moving long distances, or setting up in a new environment can introduce new calibration concerns.
Before launch, check:
-
Compass status
-
IMU status
-
Satellite count / GPS lock
-
General aircraft health warnings
-
Home point confirmation, if shown in your app
Skipping this step can create unstable performance or force troubleshooting after takeoff, when it is already too late.
7. Manually fly to check your highest obstacle
The source includes a particularly important safety recommendation: before opening DroneDeploy, use DJI GO to manually fly and check the altitude of the highest obstacle in your mission area. It also warns that obstacle avoidance is not 100% safe proof and should not be relied upon to prevent crashes. The recommendation is to plan your mission altitude carefully and fly at least 50 feet higher than the highest obstacle in the mission area.
This is one of the most practical real-world pieces of setup advice in the document. Trees, poles, structures, and elevation changes can quickly become hazards during automated flight. Even if the drone has sensing features, you should still plan conservatively.
A good obstacle check routine includes:
-
Scanning the whole mission area visually
-
Identifying the tallest tree, building, tower, or terrain feature
-
Flying manually to verify height if needed
-
Setting the mission altitude with a safe buffer
-
Remembering that obstacle avoidance is only a backup, not your main strategy
8. Understand the proper flight mode
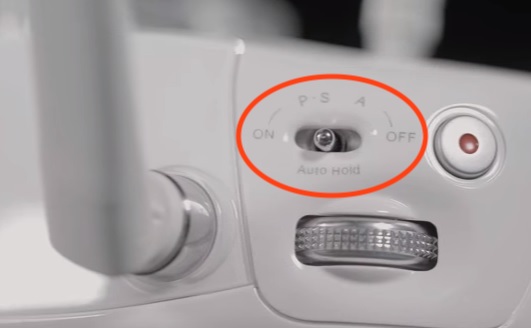
When flying with DroneDeploy, the guide says you will be prompted to switch the Phantom 4 series to P mode. It also explains that if you feel uncomfortable at any point, you should take manual control by switching to S mode for the Phantom 4 series, or initiate a return to landing using the remote controller or the home button in the app.
That means setup is not only about powering on and updating software. It also includes understanding exactly how you will regain control if something feels wrong.
Flight mode guidance for Phantom 4
-
Use P mode when prompted for automated operations
-
Switch to S mode if you need to take manual control immediately
-
Use Return to Landing if a safe automated return is more appropriate
This is a key safety principle: even during app-controlled flight, you are always in control. The pilot should never feel locked out of decision-making.
9. Mode switch reference on the remote controller
The source also includes an image showing the position of the mode switch on the remote controller, using a Phantom 4 Pro example. That visual is useful because in a stressful moment, knowing exactly where the mode switch is can make manual takeover much faster.
When preparing to fly, it helps to physically rehearse:
-
Where the mode switch is located
-
What position corresponds to P mode
-
What position corresponds to S mode
-
How to trigger Return to Home / Return to Landing
Pilots who rehearse these actions before takeoff usually respond more calmly when something unexpected happens.
10. Help maintain a strong signal between the drone and controller
The document explains that distance, physical barriers, and electromagnetic interference are the most common reasons a drone disconnects from the controller signal. Examples include buildings, hills, trees, power lines, reinforced concrete, and large metal objects.
To reduce signal problems, the document recommends the following:
-
Take off from the high point of the map
-
Take off as centered within the area as possible
-
Avoid sources of interference
-
Avoid flight plans that take the drone out of line of sight
-
Walk with the drone if necessary when the flight must go out of line of sight
-
Adjust flight direction and flight shape near problem areas
-
Stay within the advertised range of the drone
These are excellent setup habits because signal reliability is not only about hardware quality. It is also about launch location, terrain, and smart mission planning.
11. Think about takeoff location carefully
The suggestion to take off from a high point and as centered within the area as possible is especially useful in real operations. A poor takeoff position can create weak signal zones even when the drone itself is functioning perfectly.
A good launch area should ideally be:
-
Elevated if possible
-
Open and free from obstructions
-
Away from metal structures
-
Away from strong electromagnetic interference
-
Near the center of the area you plan to cover
A strong starting position often makes the entire mission more reliable.
12. Avoid interference and blocked line of sight
The source directly warns about interference from power lines, reinforced concrete, and large metal objects. It also recommends avoiding flight plans that take the drone out of your line of sight.
This means setup should include a site survey, not just an equipment survey. Ask yourself:
-
Are there tall buildings nearby?
-
Are there trees or hills that may block signal?
-
Are there towers, electrical infrastructure, or metal structures close to the route?
-
Can I keep the aircraft in view throughout the mission?
If the answer to any of these raises concern, adjust the mission plan before launch.
13. No-fly zones and restricted areas
The document also notes that DJI’s NFZ unlocking SDK can be unreliable and buggy, and warns that mapping in or around a no-fly zone may not work even with proper authorization.
That means setup for flying near restricted areas requires extra caution. Do not assume that official permission alone guarantees smooth operation in the app or aircraft system. Always verify your area, permissions, and aircraft behavior well before mission launch.
14. A practical DJI Phantom 4 pre-flight setup checklist
Here is a clean checklist based on the provided setup notes:
Before leaving home
-
Confirm your DJI Phantom 4 is supported
-
Confirm your phone or tablet is supported
-
Update iOS or Android
-
Update DroneDeploy
-
Update DJI GO
-
Power on the drone and controller
-
Open DJI GO and check firmware
-
Confirm no pending firmware updates
-
Make sure aircraft status is Normal - Ready (GPS)
At the field before launch
-
Open DJI GO first
-
Confirm Ready to Go - GPS
-
Check compass calibration
-
Check IMU calibration
-
Confirm strong GPS coverage
-
Inspect the mission area for high obstacles
-
Manually verify the height of the tallest obstacle
-
Plan to fly at least 50 feet above that obstacle
-
Hard-quit DJI GO before opening DroneDeploy
During flight
-
Use P mode when prompted for Phantom 4 automated flight
-
Be ready to switch to S mode for manual control
-
Use Return to Landing if needed
-
Maintain line of sight
-
Watch for interference and signal obstacles
15. Final advice
The most important lesson from this setup guide is that a smooth DJI Phantom 4 flight usually begins long before takeoff. Preparation at home, a careful readiness check in the field, awareness of obstacles, and a strong understanding of manual override all contribute to a safer and more successful mission. The source places special emphasis on keeping firmware current, making sure calibration is correct, checking GPS readiness, and understanding that the pilot remains responsible for safety at all times.
A well-prepared pilot is far less likely to run into connection problems, calibration warnings, signal loss, or altitude mistakes. Whether you are flying manually or using DroneDeploy for automation, taking setup seriously is one of the best things you can do for safe drone operation.